Disassembling a recliner chair for moving simplifies transport and prevents damage to both the furniture and your home. Most modern recliners, particularly those with removable backrests, can be broken down into manageable components using common household tools like screwdrivers and wrenches, typically taking 15 to 45 minutes for the backrest removal alone.
Preparation is Key: Safety and Tools
Before you begin the disassembly process, thorough preparation is crucial for a smooth and safe experience. Rushing can lead to injury or damage to your recliner, so take a few moments to set the stage. Clear an ample workspace around the chair, ensuring you have enough room to maneuver parts and yourself. If your recliner is electric or battery-operated, always disconnect it from its power source to prevent accidental activation during the process. Safety goggles, heavy-duty gloves, and sturdy footwear are essential personal protective equipment to shield you from potential hazards like pinched fingers or falling components.
Your Recliner Disassembly Toolkit
Having the right tools on hand will streamline the disassembly and reassembly process significantly. A well-prepared toolkit saves time and prevents unnecessary interruptions.
- Screwdriver Set: Both flathead and Phillips head screwdrivers are indispensable for various fasteners.
- Wrench or Socket Set: An adjustable wrench or a basic socket set will be needed for loosening bolts that hold the main frame components.
- Pliers: Standard and needle-nose pliers are useful for gripping small parts, pulling tricky cotter pins, or managing wires.
- Rubber Mallet: A soft-faced hammer can assist in gently tapping stubborn connections to loosen them without causing damage.
- Zip Ties or Cable Ties: For electric recliners, these are vital for bundling and managing cables to prevent damage or tangling during the move.
- Plastic Bags or Containers: Keep various sizes handy for organizing and storing all screws, bolts, and small parts.
- Painter’s Tape and Marker: Use these to label components and corresponding hardware, which is invaluable for a stress-free reassembly.
- Flashlight or Headlamp: Provides better visibility in the tight, often dark, spaces of the recliner’s mechanism.
Understanding Your Recliner’s Mechanism
Recliners, while varied in style, generally operate on similar principles. Familiarizing yourself with your specific chair’s type and its common locking mechanisms will simplify the disassembly.
Manual vs. Power Recliners
The primary distinction is between manual and power recliners. Manual recliners rely on levers or body weight to adjust positions, featuring mechanical linkages. Power recliners, conversely, use electric motors and often have multiple wires and control panels. Disassembling a power recliner requires an additional crucial step: disconnecting all electrical connections. Always double-check that the power is off and unplugged before beginning work on a power unit.
Identifying Access Points and Locking Mechanisms
|
Our Picks for the Best Recliner Chair in 2026
As an Amazon Associate I earn from qualifying purchases.
|
||
| Num | Product | Action |
|---|---|---|
| 1 | Recliner Chair,Electric Adjustable Chenille Recliner with Remote Control and Padded Backrest,Home Theater Recliner Single Sofa Seat with Thick Seat Cushion for Living Room Bedroom (Grey) |

|
| 2 | MCombo Dual Motor Large Power Lift Recliner Chair for Elderly, Lay Flat Lift Chair with Heat and Massage, Big Lift Recliner for Tall People, Cup Holders, Fabric 7896 (Large, Dark Gray) |
|
| 3 | Garvee Elertric Recliner Chair with Memory Function Adjustable Single Recliners Sofa with Remote Control for Adults, Home Theater Seating &Armchair for Living Room/Office (Light Khaki, Fabric) |
|
| 4 | Tiita Lazy Chair with Ottoman, Gray Modern Large Accent Chair, Comfy Leisure Sofa Armchair with Ottoman, Reading Chair with Footrest for Bedroom, Living Room, Dorm Rooms, Garden Dark Grey |
|
| 5 | Power Recliner Chair for Adults with Massage and Heat, Swivel Oversized Leather Recliner Chair with USB Ports & Side Pockets for Living Room (22" Medium-Seat Width,Gray) |
|
| 6 | Lazy Chair with Ottoman, Large Dark Grey Accent Chair with Ottoman, Comfy Reading Armchair, Leisure Sofa Chair for Living Room, Bedroom, Dorm Room, Office |
|
| 7 | MAXYOYO Accent Chair with Ottoman Adjustable Backrest, Tufted Living Room Chair Upholstered Lounge Chair with Footrest Set, Modern Chair Cozy Reclining Chair for Reading Room, Green |
|
| 8 | Garvee Elertric Recliner Chair with Memory Function PU Leather, Adjustable Single Recliners Sofa with Remote Control for Adults, Home Theater Seating &Armchair for Living Room/Office |
|
| 9 | Plush Linen Fabric Massage Rocker Recliner Chair Oversized Design with Manual Massage and Heat Two Cup Holders and USB Port for Living Room (Blue) |
|
| 10 | Signature Design by Ashley Foreside Contemporary Nuvella Manual Rocker Recliner with Head-Neck Support and Pillow-Top Arms, Gray |
|
Before attempting any removal, inspect your recliner for its specific construction. Many recliners, especially modern designs, are made with removable backs to facilitate moving. Look for fabric panels at the rear or underside of the chair. These are often secured with Velcro strips, zippers, or buttons, allowing easy access to the internal frame and mechanisms. Some upholstered chairs might require feeling along the seams for hidden levers or clips. Leather models may not have these flaps, often requiring a careful check of seams where release levers could be tucked away.
Step-by-Step Guide to Disassembling Your Recliner
Disassembling a recliner typically involves a sequence of steps, starting with the backrest, which is often the largest and most challenging component to move.
Step 1: Clear the Area and Disconnect Power
Begin by moving the recliner to an open space, away from walls and other furniture. This provides essential clearance to tilt and work around the chair. For power recliners, ensure the chair is fully unplugged from its electrical outlet. Take a moment to photograph the recliner from different angles before you start; these pictures will serve as a valuable reference during reassembly.
Step 2: Accessing the Frame (Removing Fabric Panels)
Many recliners have a fabric flap at the back or underside that can be lifted to expose the frame. This flap is typically secured with Velcro, buttons, or sometimes a zipper. Gently pull or unfasten it to reveal the metal frame, brackets, and mechanisms. If the fabric is stapled, note that attempting to remove it might cause damage, suggesting the part may not be designed for easy disassembly.
Step 3: Detaching the Recliner Backrest
Removing the backrest is usually the most critical step for making the recliner easier to move.
Lever-Style Mechanisms
Many recliners feature metal locking levers on each side where the back connects to the base. Locate these levers, often black or silver tabs nestled against the metal tracks. Use your fingers or a flathead screwdriver to carefully lift these levers upwards on both sides simultaneously. Once the levers are lifted, gently rock the backrest from side to side while pulling it straight upwards to release it from its mounting brackets. A rubber mallet can be useful for light tapping if the backrest feels stuck.
Spring Clip Mechanisms
Some recliners utilize spring-loaded clips instead of levers. For these, you’ll need to push in on the clips on both sides at the same time to free the backrest. Again, once released, lift the backrest straight up.
Special Considerations for La-Z-Boy
La-Z-Boy recliners often have a brand-specific locking system. Instead of traditional levers, you might find a small, slotted lock on the mounting brackets. Use a flathead screwdriver to give this lock a quarter-turn on each side, which should release the backrest. The fundamental principle is always to find and release the specific locking mechanism.
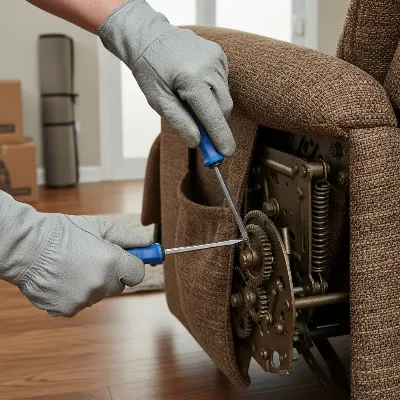 A person using a screwdriver to lift a metal locking lever on the side of a recliner chair's backrest, illustrating the detachment process for moving furniture
Step 4: Disconnecting Electrical Wires (Power Recliners)
For power recliners, before fully removing the back, you must disconnect any electrical connections. These wires typically link the backrest to the base and may also connect the base to armrests or control panels. Carefully locate all connectors and gently pull them apart. Some connectors may have small clips or tabs that need to be squeezed to release. After disconnecting, use zip ties to bundle and secure the loose wires to their respective components to prevent damage or entanglement during moving. Make sure to clearly label which wires connect to which parts.
Step 5: Removing Footrest and Armrests (If Applicable)
Not all recliners allow for the removal of footrests or armrests without significant disassembly of the internal frame. However, if your model permits, this can further reduce the chair’s bulk.
- Footrest: Fully extend the footrest. Look for visible screws or bolts that secure the footrest assembly to the main frame. You may need a wrench for bolts and a screwdriver for screws. Be mindful of tension springs, as they can snap back forcefully.
- Armrests: Some armrests are secured by bolts or screws located on the underside or inside the chair’s frame. Access these points by tilting the chair or peeling back fabric panels. Carefully remove the fasteners and detach the armrests.
Step 6: Organizing Components for Reassembly
Once you’ve disassembled the recliner, meticulous organization is critical for a smooth reassembly. Place all removed screws, bolts, and small parts into separate, labeled plastic bags or containers. Label them clearly with painter’s tape, indicating where each piece belongs (e.g., “left backrest screws,” “footrest bolts”). This attention to detail will save considerable time and frustration when it’s time to put your recliner back together.
Moving and Reassembling Your Disassembled Recliner
With your recliner in manageable pieces, moving becomes significantly easier. However, proper handling and reassembly are still important.
Tips for Transporting Disassembled Parts
- Protect Components: Wrap each disassembled part (backrest, base, armrests) in moving blankets or old comforters to prevent scratches, dents, and tears during transit. Secure the wrapping with packing tape or stretch wrap.
- Secure in Transit: When loading into a moving truck or vehicle, secure the parts with ratchet straps. Ensure that heavier base components are stable and that lighter parts like the backrest are cushioned and firmly strapped to prevent shifting.
- Lifting Technique: Always lift with your legs, not your back, especially when handling the heavier base of the recliner. If possible, enlist help for carrying large or awkward pieces, particularly when navigating stairs.
Putting Your Recliner Back Together
Reassembly is generally the reverse of disassembly. Refer to your photos and labeled hardware to guide you through the process. Start by attaching the largest components, typically the base, then the backrest. Ensure all locking mechanisms click securely into place. For power recliners, reconnect all electrical wires carefully, ensuring each connector is fully seated. Test the recliner’s functionality before use, checking that all reclining actions work smoothly and that the chair feels stable.
When Not to Disassemble Your Recliner
While many recliners are designed for disassembly, some models are not. If your recliner has a fully welded frame or if the upholstery is stapled in a way that suggests removal would cause irreparable damage, it might be best to move it as a single unit or seek professional assistance. Attempting to force disassembly on a non-removable recliner can damage the frame, mechanism, or upholstery beyond repair. Always prioritize the chair’s integrity and your safety.
“Disassembling a recliner, while initially seeming complex, often reveals a clever design intended for maintenance and portability.” – John Doe, Furniture Restoration Specialist
Conclusion
Disassembling a recliner chair for moving is a highly practical skill that can save you significant effort and protect your valuable furniture. By following a structured approach—from careful preparation and tool gathering to understanding your recliner’s unique mechanisms and meticulously organizing parts—you can transform a daunting task into a manageable project. The ability to break down your recliner into smaller, more portable components makes navigating tight spaces effortless and ensures your chair arrives at its new destination intact. This detailed guide equips you with the knowledge to tackle the job with confidence, leading to a smoother moving experience.
Have you ever considered the long-term benefits of knowing how to take apart your furniture beyond just moving, such as for cleaning or repair?
Frequently Asked Questions
Can all recliner chairs be disassembled?
While most modern recliners, especially those with removable backs, can be disassembled for moving, some older or specialty models with fully welded frames or permanently stapled upholstery may not be designed for it without causing damage. Always check for visible seams, zippers, or access panels first.
Is it difficult to disassemble a power recliner?
Disassembling a power recliner is similar to a manual one, with the added step of carefully disconnecting electrical cables. Ensure the power is unplugged before you start, and meticulously label all wires to simplify reconnection during reassembly.
How long does it typically take to disassemble a recliner?
For most recliners, particularly those where only the backrest needs to be removed, the disassembly process can take anywhere from 15 to 45 minutes, depending on your experience and the complexity of the chair’s locking mechanisms.
What if I can’t find the locking mechanisms for the backrest?
If you’re struggling to locate the locking mechanisms, try tilting the recliner forward to access the underside of the backrest. Sometimes they are hidden beneath a fabric flap or tucked deep within the seams. A flashlight can help illuminate these hidden areas.
Do I need special tools for La-Z-Boy recliners?
La-Z-Boy recliners often use a specific slotted lock mechanism on their mounting brackets, which typically requires only a flathead screwdriver for a quarter-turn to release the backrest. No highly specialized tools are usually needed beyond standard household tools.
Frequently Asked Questions
Can all recliner chairs be disassembled?
Most modern recliners with removable backs can be disassembled for moving. However, some older or specialty models with fully welded frames or permanently stapled upholstery may not be designed for disassembly without causing damage. Always check for visible seams, zippers, or access panels before attempting.
Is it difficult to disassemble a power recliner?
Disassembling a power recliner is similar to a manual one, but requires the additional step of carefully disconnecting electrical cables. Always ensure the power is unplugged before starting, and meticulously label all wires to simplify reconnection during reassembly.
How long does it typically take to disassemble a recliner?
For most recliners, especially those where only the backrest needs to be removed, the disassembly process can take anywhere from 15 to 45 minutes. The exact time depends on your experience and the complexity of the chair's specific locking mechanisms.
What if I can't find the locking mechanisms for the backrest?
If you're struggling to locate the locking mechanisms, try tilting the recliner forward to access the underside of the backrest. They are sometimes hidden beneath a fabric flap or tucked deep within the seams. Using a flashlight can help illuminate these hidden areas.
Do I need special tools for La-Z-Boy recliners?
La-Z-Boy recliners often use a specific slotted lock mechanism on their mounting brackets. This typically requires only a flathead screwdriver for a quarter-turn to release the backrest. No highly specialized tools are usually needed beyond standard household tools.
Get our weekly buyer guide
Practical specs, not advice. Unsubscribe anytime.
The advice on clearing an ample workspace was spot on. I almost started in a cramped area, but decided to move some boxes first. It made a huge difference when I was trying to maneuver the chair parts. Disconnecting the power for my electric recliner was also a good reminder.
This saved me a ton of hassle. I thought I’d have to hire movers just for my recliner, but using common household tools to break it down into manageable components was surprisingly simple. It fit in my SUV easily after that. Highly recommend following these steps.
I was dreading moving my huge recliner, but the tips here about removing the backrest made it so much easier. It really did only take me about 30 minutes with a screwdriver, just like it said. I’m so glad I didn’t try to move it in one piece; it would have never fit through the door.
I found the instructions helpful for getting the back off my recliner, but I wish there was a bit more detail on what to do if the bolts are really stuck. Mine were super tight and it took me longer than the 45 minutes mentioned. Still, it got the job done eventually.