Reupholstering an old recliner chair is a budget-friendly DIY project that can save you hundreds of dollars compared to buying new. This guide details how to improve your recliner for an estimated $200-$500 in materials, allowing you to personalize its style and extend its lifespan. It’s a rewarding project that combines practicality with creative expression, making your cherished furniture piece feel brand new.
Recliner Chairs: An Overview and Their Benefits
Recliner chairs are a staple in many homes, renowned for their unparalleled comfort and the ability to adjust to various relaxing positions. From a casual upright seat to a fully reclined lounge, these chairs offer a sanctuary for unwinding. Understanding what makes them special and their benefits can help appreciate the value of restoring one.
What is a Recliner Chair?
A recliner chair is an armchair or sofa that reclines when the occupant lowers the chair’s back and raises its front. It typically features a backrest that can be tilted back and a footrest that extends automatically or manually. Many modern recliners also include additional features like massage functions, heating elements, and swivel bases, enhancing their appeal as a hub for relaxation. The mechanism allows for seamless transitions between positions, providing customizable comfort.
Benefits of Using a Recliner Chair
The advantages of owning and using a recliner chair extend beyond mere comfort. They can significantly contribute to overall well-being. Recliners often improve posture by supporting the natural curve of the spine, alleviating pressure on the lower back and reducing common aches and pains. The ability to elevate the legs can also aid in circulation, decreasing swelling and fatigue. Recliners offer a dedicated space for relaxation, helping to reduce stress and tension after a long day, promoting mental and physical rejuvenation.
Types of Recliner Chairs
Recliner chairs come in a fascinating array of types, distinguished by their operational mechanisms, the materials used in their construction, and their overall design aesthetics. This variety ensures there’s a recliner to suit almost every preference and functional need.
By Mechanism
Recliners primarily operate through different mechanisms, each offering a unique user experience. Manual recliners typically require the user to push back on the armrests or pull a lever to engage the reclining motion and extend the footrest. They are generally simpler in design and often more budget-friendly. Power recliners, on the other hand, use electric motors, allowing for smooth, effortless adjustments via buttons or a remote control. These often offer infinite reclining positions and may include USB charging ports or other technological enhancements. Lift recliners are a specialized type of power recliner designed to assist individuals with mobility challenges, gently lifting and tilting the chair forward to help the user stand up or sit down with ease.
By Material
|
Our Picks for the Best Recliner Chair in 2026
As an Amazon Associate I earn from qualifying purchases.
|
||
| Num | Product | Action |
|---|---|---|
| 1 | MAXYOYO Accent Chair with Ottoman Adjustable Backrest, Tufted Living Room Chair Upholstered Lounge Chair with Footrest Set, Modern Chair Cozy Reclining Chair for Reading Room, Green |

|
| 2 | MCombo Dual Motor Large Power Lift Recliner Chair for Elderly, Lay Flat Lift Chair with Heat and Massage, Big Lift Recliner for Tall People, Cup Holders, Fabric 7896 (Large, Dark Gray) |
|
| 3 | Plush Linen Fabric Massage Rocker Recliner Chair Oversized Design with Manual Massage and Heat Two Cup Holders and USB Port for Living Room (Blue) |
|
| 4 | Signature Design by Ashley Foreside Contemporary Nuvella Manual Rocker Recliner with Head-Neck Support and Pillow-Top Arms, Gray |
|
| 5 | Power Recliner Chair for Adults with Massage and Heat, Swivel Oversized Leather Recliner Chair with USB Ports & Side Pockets for Living Room (22" Medium-Seat Width,Gray) |
|
| 6 | Garvee Elertric Recliner Chair with Memory Function Adjustable Single Recliners Sofa with Remote Control for Adults, Home Theater Seating &Armchair for Living Room/Office (Light Khaki, Fabric) |
|
| 7 | Recliner Chair,Electric Adjustable Chenille Recliner with Remote Control and Padded Backrest,Home Theater Recliner Single Sofa Seat with Thick Seat Cushion for Living Room Bedroom (Grey) |
|
| 8 | Garvee Elertric Recliner Chair with Memory Function PU Leather, Adjustable Single Recliners Sofa with Remote Control for Adults, Home Theater Seating &Armchair for Living Room/Office |
|
| 9 | Tiita Lazy Chair with Ottoman, Gray Modern Large Accent Chair, Comfy Leisure Sofa Armchair with Ottoman, Reading Chair with Footrest for Bedroom, Living Room, Dorm Rooms, Garden Dark Grey |
|
| 10 | Lazy Chair with Ottoman, Large Dark Grey Accent Chair with Ottoman, Comfy Reading Armchair, Leisure Sofa Chair for Living Room, Bedroom, Dorm Room, Office |
|
The choice of material for a recliner chair significantly impacts its durability, comfort, and appearance. Leather recliners offer a luxurious feel and are highly durable, often developing a rich patina over time. They are generally easy to clean but can be more expensive. Fabric recliners encompass a vast range of options, from soft, breathable cotton and linen to resilient synthetic blends like polyester and microfiber. These provide diverse textures, colors, and patterns, offering more design flexibility and often at a lower cost. Faux leather recliners provide the look and feel of real leather at a more accessible price point, often with good stain resistance and durability.
By Design Style
Recliner chairs are no longer limited to bulky, traditional designs. Today, you can find them in various styles that blend seamlessly with different interior aesthetics. Modern recliners feature sleek lines, minimalist profiles, and contemporary upholstery, often in neutral tones. Traditional or classic recliners might have rolled arms, decorative accents, and rich, plush fabrics, evoking a sense of timeless elegance. Multi-functional recliners are designed to be versatile, sometimes incorporating swivel bases, gliding mechanisms, or modular designs that adapt to changing needs, making them suitable for various living spaces and purposes.
Reupholstering vs. Buying New: A Cost Comparison
Deciding whether to reupholster an old recliner chair or invest in a new one often comes down to a careful comparison of costs and benefits. While the allure of a brand-new piece of furniture is strong, reupholstering can be a surprisingly cost-effective and rewarding alternative, especially if you opt for a DIY approach.
Professional reupholstering for a single recliner can typically range from $300 to $1,000, with some complex designs or premium fabrics pushing costs even higher. This cost primarily covers labor, which can be 15 to 25 hours at $50-$100 per hour for a sofa, and fabric expenses, which can range from $10 to $100 per yard. Recliners often require 6 to 10 yards of fabric, depending on their size and design. Additional costs may include new foam cushions ($100-$400), batting ($50-$150), and minor structural repairs ($100-$300).
In comparison, new recliners can vary widely in price, from budget-friendly options around $300 to high-end models exceeding $1,500. For pieces with solid hardwood frames, high-quality construction, or sentimental value, reupholstering often makes financial sense, potentially outlasting many new, mass-produced chairs.
However, if you choose to reupholster your recliner yourself, the cost drops dramatically. DIY reupholstery can cost between $200 and $500, covering materials like fabric and essential tools. This makes it a significantly more budget-friendly option than both professional reupholstery and purchasing a new mid-range recliner, while also allowing for complete customization of style and fabric.
Your DIY Reupholstery Project: Planning and Preparation
Embarking on a DIY recliner reupholstery project requires careful planning and preparation. Taking the time to assess your chair, gather the right tools, and select appropriate materials will make the process smoother and more successful.
Assessing Your Recliner
Before you even think about fabric, thoroughly examine your recliner. Check the frame for any wobbles, cracks, or loose joints. A sturdy frame is crucial, as major structural repairs can be complex and costly. Test the reclining mechanism to ensure it’s in good working order; if it’s faulty, you’ll need to decide if repairing or replacing parts is feasible for your budget and skill level. Also, assess the existing padding and foam. If it’s flattened, lumpy, or deteriorated, plan to replace it for optimal comfort and a professional finish. A recliner in good structural condition but with worn fabric is an ideal candidate for reupholstery.
Essential Tools and Materials
Having the right tools on hand will simplify the reupholstery process immensely. Here’s a list of what you’ll likely need:
- Upholstery Fabric: The new face of your recliner (more on this below).
- Staple Gun: A heavy-duty electric or pneumatic staple gun is highly recommended for securely attaching fabric. Manual staple guns can be used but require more effort.
- Staples: Choose staples appropriate for your staple gun and fabric thickness.
- Seam Ripper or Tack Remover: Essential for carefully removing old fabric and staples without damaging the frame. A flathead screwdriver and needle-nose pliers can also assist.
- Fabric Scissors: Sharp, dedicated fabric scissors for precise cuts.
- Measuring Tape: For accurate measurements of your old fabric pieces and new patterns.
- Upholstery Foam and/or Batting (optional): If your current cushioning needs refreshing.
- Chalk or Fabric Marker: For tracing patterns onto your new fabric.
- Screwdrivers and Wrenches: For disassembling and reassembling the recliner.
- Hammer or Mallet: For tapping in staples or adjusting components.
- Sewing Machine (optional but highly recommended): For creating clean seams, piping, or detachable cushion covers.
- Piping Cord (optional): If you wish to add decorative piping.
Choosing Budget-Friendly Fabric
The fabric choice significantly impacts both the look and cost of your reupholstery project. To keep costs down without sacrificing quality, consider these options:
- Polyester Blends: These are often very durable, stain-resistant, and come in a wide array of colors and patterns. They are budget-friendly, typically starting around $15 per yard, and resist fading.
- Microfiber: A synthetic fabric known for its soft, suede-like finish, excellent durability, and stain resistance, making it ideal for high-traffic areas or homes with pets and kids. It’s also generally more affordable than natural fabrics.
- Cotton or Canvas: While natural, certain weaves of cotton and canvas can be surprisingly durable and affordable. They offer a breathable, structured feel and can be dyed or painted for custom designs.
- Upcycling and Remnants: Look for heavy-duty tablecloths, curtains, or even denim jeans from thrift stores or discount fabric sections. Fabric remnants or end-of-roll sales at upholstery shops can yield high-quality material at a fraction of the cost.
- Avoid complex patterns: Stripes or plaids can be challenging to align on a recliner’s many moving parts, potentially leading to a sloppy finish. Large-scale or abstract patterns are generally more forgiving for DIY projects.
“When trying to save money on upholstery fabric, don’t be afraid to think outside the box. Old curtains or even durable bed sheets can offer several yards of usable fabric for a fraction of the cost.” – Jane Doe, DIY Upholstery Expert
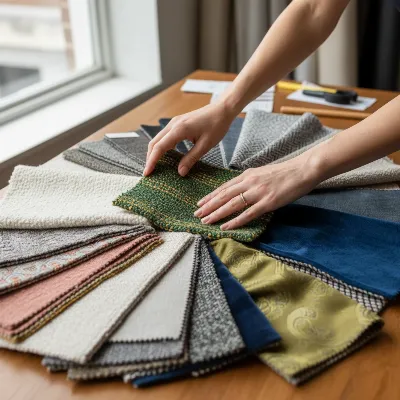 A person examining various upholstery fabric swatches to choose a budget-friendly option for a recliner, showing different textures and colors.
Step-by-Step Guide to Reupholstering a Recliner
Reupholstering a recliner chair, especially on a budget, is a multi-step process that requires patience and attention to detail. Follow these steps to give your old recliner a brand new look.
Step 1: Disassembly
Begin by moving your recliner to a spacious, well-lit work area. Recliners are often designed to come apart, which simplifies the reupholstery process significantly. Start by removing the back of the chair, which usually detaches from the main frame with a few screws or locking mechanisms. Next, carefully detach the seat deck and footrest. As you disassemble, take plenty of photos from various angles and label each piece, including where the old fabric was attached. This documentation will be invaluable when it’s time to reassemble. Store all screws, bolts, and small parts in labeled bags to avoid losing them.
Step 2: Removing the Old Fabric
This is perhaps the most time-consuming but crucial step. Using a tack remover, flathead screwdriver, and needle-nose pliers, carefully remove all the old fabric, layer by layer. Work systematically, often starting from the bottom or back of the chair where staples are visible. Try to keep the old fabric pieces as intact as possible, as they will serve as your patterns for cutting the new fabric. Label each piece of removed fabric (e.g., “left arm inside,” “seat front,” “outside back”) and note any specific markings or how it was originally folded or stretched. This meticulous approach ensures accuracy when cutting new pieces.
Step 3: Inspecting and Repairing the Frame and Padding
Once all the old fabric is off, you’ll have a clear view of the recliner’s internal structure. This is the perfect time to inspect the frame for any loose joints, cracks, or damage. Tighten any loose screws, reinforce weak areas with wood glue and clamps, or replace broken components if necessary. Check the springs and webbing for tension and integrity; replace them if they are stretched out or broken. Next, assess the existing foam padding and batting. If it’s compressed, lumpy, or has lost its resilience, replace it with new upholstery foam or add a layer of polyester batting for extra comfort and a smoother finish. High-density foam is recommended for durability.
Step 4: Cutting New Fabric
Lay your new, budget-friendly fabric flat, ensuring it’s smoothed out without wrinkles. Place the old, labeled fabric pieces on top of your new fabric. Use the old pieces as templates to trace the exact shapes onto the new fabric with chalk or a fabric marker. Always add a seam allowance of about ½ to 1 inch around the edges, especially if you plan to sew panels together or create piping. For patterned fabrics, take extra care to align patterns consistently across different sections of the chair and to center motifs where desired. “Measure twice, cut once” is an essential adage here to avoid costly mistakes.
Step 5: Attaching the New Fabric
This is where your recliner begins its transformation. Start by working from the center of each section outwards, pulling the fabric taut and smoothing out any wrinkles as you go. Secure the fabric with your staple gun, placing staples about ½ to 1 inch apart. When stapling, ensure the fabric is pulled snugly but not overly stretched, which could distort patterns or restrict the reclining mechanism. For curved areas, make small relief cuts in the seam allowance to help the fabric lie flat and smooth. Take your time, working around the contours of each piece—arms, seat, back, and footrest. If you’re adding piping, sew it onto the fabric edges before stapling, ensuring it’s neatly aligned.
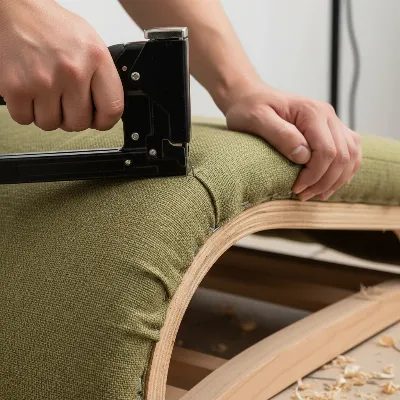 A close-up of hands using a staple gun to attach new fabric to the frame of a recliner chair, highlighting precision and tight pulling.
Step 6: Reassembly
Once all the individual components of your recliner are beautifully reupholstered, it’s time to put it all back together. Reverse the disassembly process, using your photos and labels as a guide. Start by reattaching the seat deck and footrest mechanisms, ensuring all connections are secure and nothing obstructs the reclining motion. Then, reattach the back of the chair to the main frame. Test the reclining function thoroughly to make sure everything moves smoothly and freely. Adjust any fabric that might be binding or restricting movement. A final inspection for loose staples or uneven fabric will complete your budget-friendly recliner makeover.
Maintenance and Care for Your Newly Upholstered Recliner
Congratulations on your newly upholstered recliner chair! To ensure its fresh look lasts for years, proper maintenance and cleaning are essential. The care routine will largely depend on the type of fabric you chose.
Cleaning Different Fabric Types
- Polyester and Microfiber: These synthetic fabrics are generally easy to clean. For spills, blot immediately with a clean, dry cloth. Most stains can be spot-cleaned with a mild soap and water solution. Many performance polyesters are even bleach-cleanable for tough stains.
- Cotton and Canvas: These natural fibers can absorb stains, so quick action is key. Spot clean with a gentle fabric cleaner or a mixture of mild soap and water. Avoid excessive scrubbing, which can damage fibers. Regular vacuuming helps prevent dirt buildup.
- Faux Leather: Wipe spills immediately with a damp cloth. For general cleaning, use a mild soap and water solution, then wipe dry. Avoid harsh chemicals or abrasive cleaners, as they can damage the material.
Always test any cleaning solution on an inconspicuous area first to ensure it doesn’t cause discoloration or damage.
General Maintenance Tips
- Regular Vacuuming: Frequently vacuum your recliner with an upholstery attachment to remove dust, dirt, and pet hair, preventing them from embedding in the fabric.
- Rotate Cushions (if applicable): If your recliner has removable cushions, rotate and flip them regularly to ensure even wear and extend their lifespan.
- Avoid Direct Sunlight: Prolonged exposure to direct sunlight can cause fabrics to fade and weaken over time. Position your recliner away from windows or use curtains or blinds to protect it.
- Address Spills Immediately: The faster you tackle a spill, the less likely it is to set into a permanent stain.
- Check Mechanisms Periodically: Every few months, check the reclining mechanism and frame for any loose screws or parts. Tighten them as needed to maintain stability and smooth operation.
- Professional Cleaning (Rarely): For deep cleaning or stubborn stains that DIY methods can’t handle, consider professional upholstery cleaning, though this can add to your overall cost.
By following these care guidelines, your budget-friendly reupholstered recliner chair will remain a comfortable and stylish focal point in your home for many years.
Conclusion
Reupholstering an old recliner chair on a budget is a rewarding DIY project that breathes new life into a cherished piece of furniture without breaking the bank. From carefully disassembling the chair and removing worn fabric to cutting new patterns and meticulously attaching fresh upholstery, each step contributes to a stunning transformation. Not only does it save a significant amount compared to buying new or hiring professionals, but it also allows for complete customization to match your personal style. With patience, the right tools, and an eye for budget-friendly fabrics, you can achieve a professional-looking result, creating a comfortable and stylish focal point for your home. Why let a perfectly good frame go to waste when a little effort can yield such a satisfying makeover?
Frequently Asked Questions
How much fabric do I need to reupholster a recliner chair?
A typical recliner chair usually requires between 6 to 10 yards of upholstery fabric, depending on its size, design complexity, and whether you plan to add piping or match patterns. Always measure each section carefully and add a bit extra for seam allowances and potential errors.
Is it cheaper to reupholster a recliner or buy a new one?
DIY reupholstering a recliner is generally cheaper than buying a new mid-range to high-end chair or hiring a professional. DIY costs range from $200-$500 for materials, whereas professional reupholstery can be $300-$1,000+, and new recliners vary from $300-$1,500+.
What are the best budget fabrics for reupholstering a recliner?
For a budget-friendly project, consider durable synthetic fabrics like polyester blends and microfiber, which are known for their stain resistance and affordability. Cotton canvas can also be a good option. Look for fabric remnants or discount sales for even greater savings.
How long does it take to reupholster a recliner myself?
Reupholstering a recliner can be a time-consuming project, especially for beginners. It can take anywhere from a few days to a couple of weekends, depending on your skill level, the complexity of the chair, and how much time you can dedicate each day.
What tools are essential for DIY recliner upholstery?
Key tools include a heavy-duty staple gun with staples, a seam ripper or tack remover, sharp fabric scissors, a measuring tape, screwdrivers, and a hammer. A sewing machine is highly recommended for professional-looking seams and piping.
Frequently Asked Questions
How much fabric is needed to reupholster a recliner chair?
A typical recliner chair requires 6 to 10 yards of upholstery fabric. This amount varies based on the chair's size, design complexity, and whether you plan to add piping or match patterns. Always measure each section carefully and add extra for seam allowances.
Is it more affordable to reupholster a recliner or purchase a new one?
DIY reupholstering a recliner is generally more affordable than buying a new mid-range to high-end chair or hiring a professional. DIY costs typically range from $200-$500 for materials, while professional reupholstery can cost $300-$1,000+, and new recliners range from $300-$1,500+.
What are the best budget-friendly fabrics for reupholstering a recliner?
For a budget-friendly project, durable synthetic fabrics like polyester blends and microfiber are excellent choices due to their stain resistance and affordability, often starting around $15 per yard. Cotton canvas can also be a good option. Look for fabric remnants or discount sales for greater savings.
How long does a DIY recliner reupholstery project typically take?
Reupholstering a recliner can be a time-consuming project, especially for beginners. It can take anywhere from a few days to a couple of weekends, depending on your skill level, the complexity of the chair, and the amount of time you can dedicate each day.
What essential tools are needed for DIY recliner upholstery?
Key tools for DIY recliner upholstery include a heavy-duty staple gun with appropriate staples, a seam ripper or tack remover, sharp fabric scissors, a measuring tape, screwdrivers, and a hammer. A sewing machine is highly recommended for achieving professional-looking seams and piping.
How to Reupholster a Recliner Chair on a Budget
Transform your old recliner into a stylish, comfortable piece of furniture with this step-by-step DIY guide, saving money and customizing its look.
Move your recliner to a spacious work area. Carefully remove the back, seat deck, and footrest, taking photos and labeling each piece. Store all small parts in labeled bags to prevent loss during the process.
Using a tack remover, carefully remove all old fabric, keeping pieces intact to use as patterns. Once the fabric is off, inspect the frame for damage, tighten loose screws, and check the reclining mechanism. Replace any worn padding or foam for optimal comfort.
Lay your chosen budget-friendly fabric flat and use the old fabric pieces as templates to trace and cut new sections, adding a u00bd to 1-inch seam allowance. Begin attaching the new fabric from the center of each section outwards, pulling it taut and securing it with a staple gun every u00bd to 1 inch. Make small relief cuts on curved areas for a smooth finish.
Reverse the disassembly process, using your photos and labels as a guide. Reattach the seat deck, footrest mechanisms, and the back of the chair, ensuring all connections are secure. Test the reclining function thoroughly to confirm smooth operation and adjust any fabric that might be binding.
To ensure longevity, regularly vacuum your recliner with an upholstery attachment. Blot spills immediately with a clean cloth and spot-clean with mild soap and water, testing on an inconspicuous area first. Avoid direct sunlight exposure and periodically check mechanisms for loose parts.
Get our weekly buyer guide
Practical specs, not advice. Unsubscribe anytime.
I was so close to just buying a new recliner, but this guide convinced me to try reupholstering instead. The step-by-step instructions were super clear, and I ended up spending about $350 on materials, which is way less than a new chair. My old recliner looks brand new and fits my living room decor perfectly now. Definitely a rewarding project!
I tried following the guide to reupholster my recliner, and while the instructions were mostly good, I found the section on handling the reclining mechanism a bit tricky. It took me longer than expected to figure out that part. The overall concept of saving money compared to buying new is great, but it’s definitely a project that requires some patience and maybe a second set of hands.
This DIY guide was really helpful for giving my worn-out recliner a facelift. I appreciated the breakdown of estimated costs, which helped me budget for the fabric and tools. The only minor complaint I have is that some of the fabric cutting tips could have been a bit more detailed for a complete beginner like me. Still, I’m happy with the end result.
I’ve always wanted to tackle a reupholstery project, and my old recliner was the perfect candidate. This guide made the process feel much less intimidating. I loved the idea of extending the lifespan of a cherished furniture piece rather than just tossing it. It really does feel like a brand new chair now, and I saved a ton of money.