Replacing a broken recliner pull cable is a straightforward DIY project that typically takes less than an hour and costs between $10 and $30 for parts, saving significant money compared to professional repairs or buying a new chair. This common issue, often caused by repetitive stress on the cable’s exposed wire section, can be fixed with basic tools like a Phillips head screwdriver and pliers. By understanding your recliner’s cable type and following a few simple steps, you can restore full functionality to your favorite chair.
Understanding Your Recliner Cable
Recliner cables are the hidden workhorses that connect your chair’s handle or lever to its intricate reclining mechanism, allowing the footrest to extend or retract smoothly. Over time, these cables are subjected to constant pulling and tension, leading to inevitable wear and tear.
What Causes Recliner Cables to Break?
The primary culprit behind a broken recliner cable is often repetitive stress, particularly at tension points where the cable bends or connects to other components. The “tail” of the cable, which is the exposed wire section, is especially vulnerable to fraying or snapping. Many cables also feature plastic clips or housing that can become brittle and break over time. Excessive force on the handle or swift, jerky movements can prematurely wear out the cable and its connections. Sometimes, the problem isn’t the cable itself but the handle or lever breaking where it connects to the cable, making it impossible to pull. For see our recliner chairs recommendations on this site.
Why DIY Replacement is a Smart Solution
Opting for a DIY replacement offers several compelling advantages. Firstly, it’s incredibly cost-effective. Replacement cable and handle assemblies are relatively inexpensive, often available for a fraction of the cost of a new recliner or professional repair service. Secondly, the process itself is not overly complex, requiring minimal tools and basic mechanical aptitude. Many people find satisfaction in fixing things themselves, and successfully repairing your recliner can be a rewarding experience. It also means less downtime for your favorite seat, getting you back to lounging faster.
Tools and Replacement Parts You’ll Need
Before you begin, gathering the correct tools and a suitable replacement cable is crucial for a smooth repair. Having everything on hand will prevent interruptions and make the process much more efficient.
Essential Tools for the Job
You’ll be surprised how few tools are actually required for this repair. The most common tools include:
- Phillips Head Screwdriver: This will be used to remove the screws that secure the recliner handle to the chair’s armrest or side.
- Pliers (Needle-Nose Recommended): Pliers are essential for disconnecting the old cable from the reclining mechanism and for securing the new one. Needle-nose pliers can be particularly helpful for reaching into tight spaces and manipulating small clips or hooks.
- Work Gloves (Optional but Recommended): To protect your hands from potential pinches or sharp edges on the recliner’s metal frame.
- Flashlight or Headlamp (Optional): To illuminate the underside of the recliner and the mechanism, making it easier to see connections.
Selecting the Right Replacement Cable
|
Our Picks for the Best Recliner Chair in 2026
As an Amazon Associate I earn from qualifying purchases.
|
||
| Num | Product | Action |
|---|---|---|
| 1 | Garvee Elertric Recliner Chair with Memory Function PU Leather, Adjustable Single Recliners Sofa with Remote Control for Adults, Home Theater Seating &Armchair for Living Room/Office |

|
| 2 | Tiita Lazy Chair with Ottoman, Gray Modern Large Accent Chair, Comfy Leisure Sofa Armchair with Ottoman, Reading Chair with Footrest for Bedroom, Living Room, Dorm Rooms, Garden Dark Grey |
|
| 3 | Signature Design by Ashley Foreside Contemporary Nuvella Manual Rocker Recliner with Head-Neck Support and Pillow-Top Arms, Gray |
|
| 4 | Power Recliner Chair for Adults with Massage and Heat, Swivel Oversized Leather Recliner Chair with USB Ports & Side Pockets for Living Room (22" Medium-Seat Width,Gray) |
|
| 5 | MCombo Dual Motor Large Power Lift Recliner Chair for Elderly, Lay Flat Lift Chair with Heat and Massage, Big Lift Recliner for Tall People, Cup Holders, Fabric 7896 (Large, Dark Gray) |
|
| 6 | Garvee Elertric Recliner Chair with Memory Function Adjustable Single Recliners Sofa with Remote Control for Adults, Home Theater Seating &Armchair for Living Room/Office (Light Khaki, Fabric) |
|
| 7 | Recliner Chair,Electric Adjustable Chenille Recliner with Remote Control and Padded Backrest,Home Theater Recliner Single Sofa Seat with Thick Seat Cushion for Living Room Bedroom (Grey) |
|
| 8 | MAXYOYO Accent Chair with Ottoman Adjustable Backrest, Tufted Living Room Chair Upholstered Lounge Chair with Footrest Set, Modern Chair Cozy Reclining Chair for Reading Room, Green |
|
| 9 | Lazy Chair with Ottoman, Large Dark Grey Accent Chair with Ottoman, Comfy Reading Armchair, Leisure Sofa Chair for Living Room, Bedroom, Dorm Room, Office |
|
| 10 | Plush Linen Fabric Massage Rocker Recliner Chair Oversized Design with Manual Massage and Heat Two Cup Holders and USB Port for Living Room (Blue) |
|
Choosing the correct replacement cable is perhaps the most critical step. Recliner cables are not one-size-fits-all, and compatibility is key.
- Measure Your Old Cable: The most reliable method is to measure your existing cable. Focus on two main measurements:
- Exposed Wire Length (Tail Length): This is the length of the metal wire that extends beyond the plastic casing. This measurement is crucial for ensuring proper tension when the cable is installed.
- Total Cable Length: The full length from the S-hook (or barrel end) to the end of the plastic casing.
- Consider Cable Endings: Cables typically have an S-shaped hook or a barrel-shaped end that connects to the reclining mechanism. Ensure your new cable has the same type of ending.
- Handle Type: Many replacement cables come pre-attached to a new handle (e.g., D-ring, paddle, or cup-style handle). It is often recommended to replace the handle and cable as a single unit, as the handle itself can be a weak point or may not be compatible with a separate cable. Match the style and mounting of your original handle.
- Universal vs. Specific: While “universal” replacement cables exist, always verify measurements and connections. If possible, note your recliner’s brand and model number to search for a more specific replacement part.
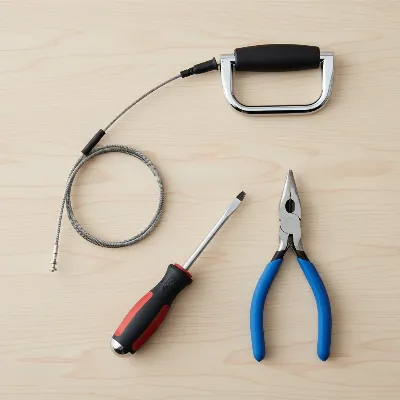 Essential tools for replacing a recliner pull cable, including screwdrivers, pliers, and a new cable assembly.
Step-by-Step Guide to Replacing Your Recliner Cable
Once you have your tools and the correct replacement cable, you’re ready to tackle the repair. This guide breaks down the process into manageable steps.
Step 1: Prepare the Recliner and Ensure Safety
Before starting any work, ensure the recliner is disconnected from any power source if it’s an electric model. If your recliner is heavy, enlist help to move it. You’ll need access to the underside and sides of the chair. The easiest way to work is often to:
- Turn the Recliner on its Side: Laying the chair on its side provides good access to the handle and the internal mechanism. Use old blankets or cardboard to protect your floor and the chair’s upholstery.
- Engage the Footrest (if possible): If the footrest can still be extended, do so before turning the chair over, as this can sometimes provide better access to the cable connection point underneath.
Step 2: Disconnect the Old Cable from the Mechanism
Locate the reclining mechanism underneath the chair. Follow the path of the broken cable until you find where it connects.
- Identify the Connection Point: The end of the cable (often with an S-hook or metal tab) will be inserted into a small hole or slot on the metal reclining mechanism.
- Remove the Hook/Tab: Carefully use your pliers to unhook the S-shaped end or pinch and pull up on the metal tab to release it from the mechanism. Some designs may require a bit of manipulation or pressure to dislodge.
Step 3: Remove the Old Handle and Cable Assembly
Now that the cable is disconnected from the mechanism, you can remove the handle and the rest of the cable from the chair.
- Locate the Handle Screws: The handle is usually secured to the armrest or side of the chair by two Phillips head screws.
- Remove Screws: Use your Phillips head screwdriver to remove these screws and set them aside carefully, as you’ll need them for the new handle.
- Remove Plastic Clips: Along the cable’s path, you’ll find plastic clips that hold the cable casing in place. Gently squeeze or pry these clips to release the cable.
- Pull Out the Old Assembly: Once all screws and clips are detached, gently pull the handle and the entire cable assembly out of the chair.
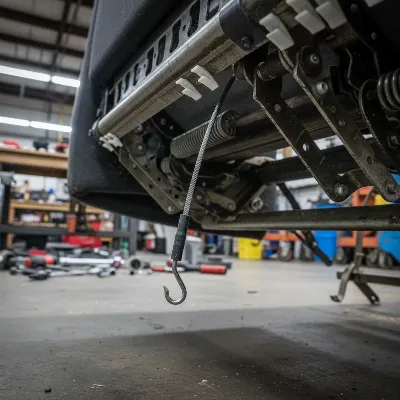 Detailed view of a recliner's metal mechanism with an old broken pull cable disconnected and visible plastic clips along its path.
Step 4: Install the New Cable and Handle
With the old cable removed, it’s time to install the replacement. This process is essentially the reverse of removal.
- Thread the New Cable: Begin by feeding the cable end (the part that connects to the mechanism, not the handle) through the hole where the old cable exited the armrest or side of the chair. Guide it along the same path as the old cable towards the reclining mechanism.
- Secure the Handle: Once the cable is threaded and the handle is correctly positioned, use the screws you saved to attach the new handle to the armrest or side of the chair. Ensure it’s snug but don’t overtighten.
- Insert Plastic Clips: Re-insert the plastic clips along the cable’s path to secure the cable casing. This prevents the cable from dangling or interfering with the reclining mechanism.
Step 5: Reconnect the New Cable to the Mechanism
This step requires careful attention to ensure proper function and tension.
- Connect to the Mechanism: Guide the S-hook or metal tab of the new cable into the corresponding hole or slot on the reclining mechanism. You may need to apply a little tension to the cable while doing this to help it click into place. It’s crucial that the cable’s exposed wire section is correctly aligned with the mechanism’s lever.
- Verify Tension: A properly installed cable will have a slight amount of tension. If it’s too loose, the mechanism might not engage fully. If it’s too tight, it could cause premature wear or keep the recliner partially engaged. The footrest should return fully when the handle is released.
- Double-Check All Connections: Before putting the chair back upright, quickly review all connections to ensure everything is securely in place.
Step 6: Test the Recliner
Return the recliner to its upright position.
- Functionality Test: Gently pull the recliner handle to extend the footrest. It should move smoothly and fully. Release the handle, and the footrest should retract completely.
- Smooth Operation: Listen for any unusual sounds or feel for any sticking points. If anything feels off, revisit the connections, especially the tension at the mechanism.
Troubleshooting Common Issues During Replacement
Even with a detailed guide, you might encounter a few hiccups. Here are some common problems and their solutions:
- Cable Doesn’t Fit: If the new cable’s exposed wire length is incorrect, it may not engage the mechanism properly. A cable that’s too long will have slack, preventing the footrest from extending. One that’s too short will be constantly under tension, leading to quick wear or the footrest not fully retracting. Always measure carefully before purchasing.
- Mechanism Not Engaging: Double-check that the S-hook or metal tab is fully seated in its slot on the mechanism. Sometimes, it looks connected but isn’t quite far enough in to activate the lever. Ensure the plastic casing is securely clipped, providing the necessary leverage for the inner wire.
- Footrest Not Fully Retracting/Extending: This often points to incorrect cable tension. Adjust the cable at the mechanism connection point if possible, ensuring there’s just enough slack for full range of motion without being loose. Some cables have adjustable barrel ends that allow for minor tension adjustments.
- Difficulty Reaching Clips/Mechanism: Recliners can have tight spaces. Using needle-nose pliers can help. For very stubborn clips, a small flat-head screwdriver might help pry them. If the mechanism is severely obstructed, it might be necessary to temporarily remove more upholstery or carefully tilt the chair in different directions to gain better access.
Maintaining Your Recliner to Prevent Future Cable Breaks
A successful cable replacement sets your recliner up for many more years of service. However, a little preventive maintenance can significantly extend the life of your new cable and the chair’s overall mechanism.
Gentle Use and Regular Inspection
- Avoid Forceful Pulls: Encourage gentle and smooth operation of the recliner handle. Jerking or yanking the handle puts undue stress on the cable and its connections.
- Regular Visual Checks: Periodically inspect the visible parts of the cable and its connection points, especially underneath the chair and near the handle. Look for signs of fraying, bending, or loose clips. Addressing minor issues early can prevent a full break.
- Keep Mechanisms Clean: Dust, pet hair, and debris can accumulate around the reclining mechanism, hindering its smooth operation and potentially snagging on cables. A quick vacuum or wipe-down every few months can help.
- Lubrication: Occasionally, apply a small amount of furniture-safe lubricant (like silicone spray) to the moving metal parts of the reclining mechanism. This reduces friction and stress on the cable.
“A common misconception is that recliners are designed to withstand aggressive use. In reality, the intricate mechanisms, especially the pull cables, benefit immensely from gentle handling and routine inspections. Proactive care is the best defense against premature wear and tear.” – John Smith, Master Upholstery Technician
Conclusion
Replacing a broken recliner pull cable is an accessible and cost-effective DIY project that can quickly bring your favorite chair back to life. By carefully following the steps—from gathering the right tools and replacement parts to meticulously installing the new cable and performing a final test—you can successfully tackle this common household repair. Not only does it save you money, but it also provides a sense of accomplishment. that a little gentle use and occasional maintenance go a long way in ensuring the longevity of your recliner’s newfound functionality. So, why not empower yourself with the skills to keep your comfort station in top shape? What other small home repairs have you put off that you could tackle next?
Frequently Asked Questions
Can I just replace the cable or do I need a new handle too?
While it’s sometimes possible to replace just the cable, it is often recommended to replace the handle and cable as a single assembly. This is because the handle itself is a common point of failure, and a new cable attached to an old, worn handle might quickly break again.
How do I know what size recliner cable to buy?
The most accurate way is to measure your old cable. Specifically, measure the exposed wire length (the “tail”) and the total cable length from end to end. Ensure the replacement cable has the same type of end fittings (e.g., S-hook or barrel end) as your old one for compatibility with the mechanism.
What if my recliner has no visible screws for the handle?
Some recliner handles, especially paddle or D-ring styles, may be secured by clips or other hidden fasteners rather than screws. Gently probe around the handle’s base or consult your recliner’s manual for specific instructions on how to detach it. Prying gently with a flat-head screwdriver might reveal hidden clips.
Can I repair a frayed recliner cable instead of replacing it?
Attempting to repair a frayed cable is generally not recommended as a long-term solution. The structural integrity of the cable is compromised, and a repair will likely be temporary, failing again quickly under tension. Replacement is the safest and most reliable option for a lasting fix.
Is it hard to thread the new cable through the recliner?
Threading the new cable can be the trickiest part, especially in recliners with complex internal structures. Following the exact path of the old cable as you remove it can guide you. Using a flashlight to illuminate the internal channels and gently manipulating the cable can help it pass through smoothly.
How much should a replacement recliner cable cost?
Replacement recliner cable and handle assemblies are relatively inexpensive, often ranging from $10 to $30, depending on the type and vendor. This makes DIY repair a very budget-friendly alternative to professional services or buying a new chair.
Replace a Broken Recliner Pull Cable
This guide provides step-by-step instructions to replace a broken recliner pull cable, restoring your chair's functionality with basic tools and a new cable assembly.
Disconnect electric recliners from power. If the chair is heavy, get help to move it. Lay the recliner on its side to access the handle and internal mechanism, using blankets to protect the floor and upholstery. If possible, engage the footrest before tilting for better access.
Locate the reclining mechanism underneath the chair and follow the broken cable to its connection point. Use pliers to carefully unhook the S-shaped end or pinch and pull up on the metal tab to release it from the mechanism. Some designs may require manipulation to dislodge.
Locate and remove the two Phillips head screws securing the handle to the armrest or side of the chair, setting them aside. Gently squeeze or pry any plastic clips holding the cable casing in place along its path. Once all fasteners are detached, gently pull the handle and the entire cable assembly out of the chair.
Feed the cable end (for the mechanism) through the hole where the old cable exited, guiding it along the same path towards the reclining mechanism. Secure the new handle to the armrest or side of the chair using the saved screws, ensuring it's snug. Re-insert plastic clips along the cable's path to secure the casing and prevent dangling.
Guide the S-hook or metal tab of the new cable into its slot on the reclining mechanism, applying slight tension to help it click into place. Verify proper tension; it should have a slight amount without being too loose or too tight. Return the recliner upright and test the handle to ensure the footrest extends and retracts smoothly and fully.
Get our weekly buyer guide
Practical specs, not advice. Unsubscribe anytime.
This DIY guide was a lifesaver! My old cable snapped right at the exposed wire section, which is exactly what the post mentioned. I followed the steps, and with just a screwdriver and pliers, I got it fixed. It was a bit fiddly getting the new cable threaded, but overall, a very manageable project. Definitely recommend trying this before calling a repairman.
The guide was pretty good for replacing my recliner pull cable. It definitely saved me from buying a whole new chair. My only minor complaint is that it didn’t emphasize enough how tight some of those screws can be, I almost stripped one. But once I got past that, the rest was straightforward and the chair works again.
I was so close to buying a new recliner because the footrest wouldn’t extend, but then I found this guide. The instructions for identifying the cable type were super helpful. I ordered a replacement for about $15 and had it swapped out in under an hour. My chair feels brand new again, and I saved a ton of money!
I can’t believe how easy this was! My recliner handle had been useless for months, and I thought it was a goner. The part about how it typically costs between $10 and $30 for parts was spot on. I got a new cable for $12, and now my favorite chair is fully functional again. So glad I didn’t pay for a professional repair.