A squeaky recliner can disrupt relaxation, but many issues are easily resolved at home with basic tools. The primary causes of recliner squeaks include dry mechanisms, loose fasteners, and worn-out parts, which increase friction and create noise. This guide provides a comprehensive, step-by-step approach to diagnosing and fixing these common problems, ensuring your recliner returns to silent operation.
Understanding Recliner Squeaks: Causes and Importance
Recliners are complex pieces of furniture, combining upholstery with intricate mechanical systems that allow for smooth movement and comfortable positioning. Over time, these moving parts can experience wear and tear, leading to those infamous squeaks and creaks.
What Makes Recliners Squeak?
The primary culprits behind a noisy recliner often fall into a few categories. Dry mechanisms are a common cause, as metal-on-metal friction increases when pivot points, springs, and hinges lack proper lubrication. This friction generates noise as components rub against each other during movement. Loose fasteners, such as bolts, nuts, and screws, can also contribute significantly. When these vital connections become even slightly undone, parts of the recliner’s frame or mechanism can shift and rub, creating unsettling sounds. In some cases, worn-out parts like nylon bushings, which are designed to reduce friction in pivot points, can lead to metal rubbing directly against metal. Less frequently, bent components within the reclining mechanism or even simple wood-on-wood friction in the chair’s frame can cause creaks and groans.
Why Addressing Squeaks is Important
Beyond the immediate disruption to your peace and quiet, addressing a squeaky recliner is crucial for several reasons. Persistent squeaking often signals increased friction within the mechanism, which, if left unaddressed, can lead to accelerated wear and tear on vital components. This can shorten the lifespan of your recliner and potentially lead to more significant, costlier repairs down the line. A well-maintained and silent recliner not only enhances your comfort but also preserves your investment, ensuring you can enjoy its benefits for years to come. Ignoring the warning signs of a noisy mechanism can transform a simple DIY fix into a premature replacement.
Tools and Materials for Your DIY Fix
Before you begin your recliner repair project, gathering the right tools and materials will ensure a smooth and efficient process. Having everything at hand prevents interruptions and helps maintain focus.
Essential Toolkit:
- Silicone Spray Lubricant: This is a versatile, non-greasy option that won’t attract dust. It’s safe for metal, plastic, and vinyl parts and is often the best first choice for general recliner lubrication.
- White Lithium Grease: A thicker, more durable lubricant, ideal for metal-on-metal joints that endure significant pressure. It offers long-lasting protection but can be a bit messier to apply.
- Adjustable Wrench or Socket Set: Crucial for tightening various nuts and bolts found throughout the recliner mechanism.
- Screwdrivers (Phillips and Flathead): Essential for securing screws and potentially removing dust covers.
- Clean Rags or Cloths: For wiping away excess lubricant and cleaning dust or debris.
- Flashlight: To illuminate dark, hard-to-reach areas of the mechanism.
- Drop Cloth or Tarp: To protect your flooring from dirt, dust, and lubricant spills.
- Safety Glasses: To protect your eyes, especially when spraying lubricants.
- Small Brush or Vacuum with Attachment: For cleaning dust and debris from tight spaces.
- Baby Powder or Talcum Powder (Optional): Useful for addressing wood-on-wood friction.
Having these items readily available will streamline your repair process, making it easier to tackle any squeak source you uncover.
Diagnosing the Squeak: Pinpointing the Source
The first and most critical step in fixing a squeaky recliner is accurately pinpointing the origin of the noise. A squeak can come from various parts of the chair, and a targeted approach is far more effective than haphazardly spraying lubricant.
How to Locate the Noise
|
Our Picks for the Best Recliner Chair in 2026
As an Amazon Associate I earn from qualifying purchases.
|
||
| Num | Product | Action |
|---|---|---|
| 1 | Signature Design by Ashley Foreside Contemporary Nuvella Manual Rocker Recliner with Head-Neck Support and Pillow-Top Arms, Gray |

|
| 2 | Power Recliner Chair for Adults with Massage and Heat, Swivel Oversized Leather Recliner Chair with USB Ports & Side Pockets for Living Room (22" Medium-Seat Width,Gray) |
|
| 3 | Plush Linen Fabric Massage Rocker Recliner Chair Oversized Design with Manual Massage and Heat Two Cup Holders and USB Port for Living Room (Blue) |
|
| 4 | Recliner Chair,Electric Adjustable Chenille Recliner with Remote Control and Padded Backrest,Home Theater Recliner Single Sofa Seat with Thick Seat Cushion for Living Room Bedroom (Grey) |
|
| 5 | MCombo Dual Motor Large Power Lift Recliner Chair for Elderly, Lay Flat Lift Chair with Heat and Massage, Big Lift Recliner for Tall People, Cup Holders, Fabric 7896 (Large, Dark Gray) |
|
| 6 | MAXYOYO Accent Chair with Ottoman Adjustable Backrest, Tufted Living Room Chair Upholstered Lounge Chair with Footrest Set, Modern Chair Cozy Reclining Chair for Reading Room, Green |
|
| 7 | Garvee Elertric Recliner Chair with Memory Function Adjustable Single Recliners Sofa with Remote Control for Adults, Home Theater Seating &Armchair for Living Room/Office (Light Khaki, Fabric) |
|
| 8 | Lazy Chair with Ottoman, Large Dark Grey Accent Chair with Ottoman, Comfy Reading Armchair, Leisure Sofa Chair for Living Room, Bedroom, Dorm Room, Office |
|
| 9 | Garvee Elertric Recliner Chair with Memory Function PU Leather, Adjustable Single Recliners Sofa with Remote Control for Adults, Home Theater Seating &Armchair for Living Room/Office |
|
| 10 | Tiita Lazy Chair with Ottoman, Gray Modern Large Accent Chair, Comfy Leisure Sofa Armchair with Ottoman, Reading Chair with Footrest for Bedroom, Living Room, Dorm Rooms, Garden Dark Grey |
|
Start by moving your recliner to a quiet area where you can clearly hear the sounds it makes. Slowly operate the recliner’s functions: recline it fully, return it to an upright position, rock it (if applicable), and swivel it (if it’s a swivel recliner). As you move the chair, listen intently. Try to identify if the squeak occurs when you lean back, push forward, or when the footrest extends or retracts. Getting a second person to operate the chair while you listen closely, or even gently press on different parts, can be incredibly helpful. Pay attention to whether the sound is a consistent squeak, a groan, a click, or a rub. This initial observation provides valuable clues about the type of issue and its general location.
Common Squeak Zones
Recliners have several areas prone to developing squeaks:
- Springs: The springs, particularly those supporting the seat and backrest or within the footrest mechanism, can become dry and noisy.
- Pivot Points and Hinges: These are the joints where different metal components connect and move. Over time, friction can build up here, causing squeaks.
- Linkages and Glide Tracks: The metal rods and tracks that guide the footrest and backrest can dry out or accumulate dirt.
- Frame Connections: Screws, bolts, and wooden joints in the chair’s underlying frame can loosen, causing rubbing and creaking.
- Bushings: Small plastic or nylon rings at pivot points can wear down, leading to metal-on-metal contact.
- Footrest Mechanism: The complex system of levers and rods that operates the footrest is a common source of noise due to its many moving parts.
Once you have a general idea of the squeak’s location, you can proceed with the repair process, focusing your efforts on the most likely problem areas.
Step-by-Step DIY Recliner Squeak Fix
With a diagnosis in hand, it’s time to get hands-on. This step-by-step guide will walk you through the process of silencing your noisy recliner.
Step 1: Prepare Your Workspace and Chair
Begin by moving your recliner away from any walls or obstacles, ensuring you have ample space to work around it. Lay down a drop cloth or tarp on the floor to protect your carpet or hard surfaces from dirt, dust, and potential lubricant drips.
Next, fully recline the chair and, with the help of another person if it’s heavy, carefully flip it over onto its front or side. This will expose the underside mechanism, making it accessible for inspection and repair. Most recliners have a dust cover (often a fabric or plastic sheet) stapled or screwed to the bottom frame. Carefully remove this cover using a flathead screwdriver or staple remover to expose the internal workings.
Step 2: Inspect and Clean the Mechanism
With the mechanism exposed, grab your flashlight and thoroughly inspect all moving parts. Look for any visible debris, such as dust bunnies, pet hair, or small objects that might be caught in the gears or linkages. These obstructions can impede movement and contribute to noise. Use a small brush or a vacuum cleaner with a brush attachment to meticulously clean away any accumulated dirt and grime. A clean mechanism is essential for effective lubrication and smooth operation. Also, look for any signs of wear, such as metal shavings or excessive play in the joints.
Step 3: Tighten All Loose Fasteners
Loose connections are a frequent cause of squeaks. Systematically go through the entire mechanism and chair frame, checking all visible bolts, nuts, and screws. Use your adjustable wrench, socket set, or screwdrivers to tighten any fasteners that feel even slightly loose. Turn them clockwise until snug, but be careful not to overtighten, as this could strip threads or damage components. Pay particular attention to the connections around the footrest, backrest, and main frame where movement is most frequent. This simple step alone can often eliminate many squeaks.
Step 4: Lubricate Key Moving Parts
This is arguably the most crucial step in silencing a squeaky recliner. Choose the appropriate lubricant: silicone spray for general use and for plastic/metal contact, or white lithium grease for heavy-duty metal-on-metal friction points.
Apply the lubricant sparingly but thoroughly to all pivot points, springs, hinges, linkages, and glide tracks. If using a spray, use the thin straw attachment to direct the lubricant precisely into tight spots. Focus on areas where metal rubs against metal, or where parts rotate and slide. the springs under the seat and those in the footrest mechanism.
Once applied, work the reclining mechanism back and forth several times. Recline and close the chair repeatedly to help distribute the lubricant evenly across all moving surfaces. This action ensures the lubricant penetrates effectively and reaches all the areas causing friction. After working the mechanism, use a clean rag to wipe away any excess lubricant to prevent it from attracting dust or staining your upholstery.
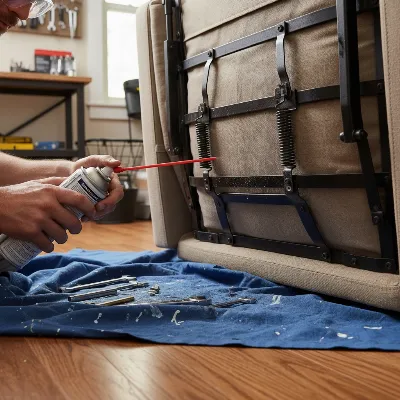 A close-up shot of a person applying silicone spray lubricant to the metal hinges and pivot points of an inverted recliner chair mechanism, with safety glasses on and a drop cloth visible underneath, in a home DIY setting.
Step 5: Address Frame or Upholstery Squeaks (Less Common)
While most squeaks originate from the metal mechanism, sometimes the chair’s frame or even the upholstery can be the culprit. If, after lubricating and tightening, you still hear a creak that sounds like wood-on-wood rubbing, this might be the issue. Carefully identify the exact wooden joints where the sound originates. A small amount of baby powder or talcum powder can be very effective here. Gently puff the powder into the tight spaces where the wood sections meet, as the fine particles can reduce friction.
For upholstery-related squeaks, which are rare, carefully check if any fabric or leather is rubbing tightly against the frame or another part of the chair. Sometimes a minor adjustment of the upholstery or adding a thin piece of felt in the contact area can help.
Step 6: Test and Reassemble
Once you’ve applied all necessary fixes, carefully flip the recliner upright again. Sit in the chair and slowly operate the reclining function multiple times. Listen intently. Has the squeak disappeared? If a faint noise persists, try to isolate it again and reapply lubricant or re-tighten fasteners to that specific spot. Sometimes, a second application is needed.
Once you are satisfied that the squeaks are gone, reattach the dust cover to the underside of the chair. This cover protects the mechanism from dust and debris, helping to prevent future squeaks. Ensure it’s securely fastened.
Choosing the Right Lubricant for Your Recliner
Selecting the correct lubricant is paramount for an effective and lasting fix. Using the wrong product can worsen the problem or even damage your chair.
Silicone Spray: The Versatile Choice
Silicone spray lubricants are often the top recommendation for recliner mechanisms. They are lauded for being clean, non-greasy, and critically, they do not attract dust and dirt like oil-based lubricants. This means your newly quieted mechanism won’t quickly become caked with grime again. Silicone spray is safe for use on a variety of materials, including metal, plastic, and vinyl, making it a versatile option for the diverse components within a recliner. It provides a smooth, long-lasting film that reduces friction without leaving a heavy residue.
White Lithium Grease: For Heavy-Duty Metal-on-Metal
For pivot points and heavier metal-on-metal joints that bear significant weight and pressure, white lithium grease can be an excellent choice. This lubricant is thicker and more durable than silicone spray, offering a robust, long-lasting film that withstands high friction. While it’s more effective in these specific high-stress areas, it’s also messier to apply and can attract more dust if not carefully wiped clean. It is best reserved for those crucial metal connections that show signs of persistent wear or require a more substantial lubrication.
Lubricants to Avoid: WD-40 and Household Oils
It’s equally important to know which products to avoid. WD-40 is a common household item, but it is primarily a water displacer and a solvent, not a true, lasting lubricant. While it might offer temporary relief by dissolving rust or loosening stuck parts, it tends to evaporate quickly, stripping away any existing lubrication and potentially leaving parts even drier and noisier than before. For recliner mechanisms, it is generally not recommended. Similarly, household oils like cooking oil or thin 3-in-1 oil are too thin and have a strong tendency to attract dust and debris, quickly creating a sticky, gritty mess that can further hinder the mechanism’s smooth operation and lead to accelerated wear. Stick to specialized lubricants designed for friction reduction.
Preventative Maintenance for a Quieter Recliner
Once you’ve successfully silenced your squeaky recliner, adopting a routine of preventative maintenance is key to keeping it quiet and extending its lifespan. A little proactive care goes a long way in avoiding future noisy issues.
Regular Inspection and Tightening of Fasteners
Make it a habit to periodically check all visible bolts, nuts, and screws on your recliner’s frame and mechanism. A good schedule would be to do a quick inspection and tightening every 6 months. Over time, the constant movement and pressure of reclining can cause these fasteners to loosen gradually. A swift twist with the appropriate wrench or screwdriver will keep them snug, preventing the components from shifting and rubbing against each other, which is a common source of creaks and squeaks.
Annual Lubrication
Even if your recliner isn’t making noise, its moving parts benefit greatly from annual lubrication. Apply a light coat of silicone spray or white lithium grease to all pivot points, hinges, and glide tracks once a year. This ensures a consistent, low-friction environment for the mechanism, preventing the dryness that often precedes squeaks. Regular lubrication also helps protect the metal components from rust and corrosion, contributing to the chair’s overall longevity.
Keep Mechanism Clean
Dust, pet hair, and debris can accumulate within the recliner’s mechanism, causing friction and hindering smooth operation. Regularly vacuum under and around the chair, using a brush attachment to clean out the crevices and exposed mechanical parts. If you have pets, more frequent cleaning might be necessary. A clean mechanism not only prevents squeaks but also reduces wear on the moving components.
 A well-maintained, modern recliner chair in a cozy living room, symbolizing quiet comfort and longevity achieved through regular cleaning and lubrication, with a soft throw blanket draped over it.
Avoid Abrupt Movements
Treat your recliner gently. Avoid slamming the footrest down or forcing the reclining action with excessive weight or sudden movements. Recliners are designed to glide smoothly; abrupt actions can put unnecessary stress on the mechanism, causing parts to bend, loosen, or wear out prematurely. Encourage family members to operate the chair with care, letting the mechanism work as intended.
Use a Rug Under the Chair
If your recliner is on a hard floor, consider placing a rug or mat underneath it. This can help even out minor floor slopes and reduce the overall stress on the chair’s frame, which might subtly twist or strain the mechanism on an uneven surface. A rug also helps absorb vibrations and can slightly dampen any residual noises.
When to Seek Professional Help
While many recliner squeaks can be resolved with DIY efforts, there are instances when professional intervention is the safest and most effective course of action. Knowing when to call in an expert can save you further frustration and potential damage to your valuable furniture.
If your recliner continues to squeak stubbornly after you’ve thoroughly followed all the DIY troubleshooting and lubrication steps, it might indicate a more complex underlying issue. This could include severely worn-out internal components, bent metal parts that are beyond simple straightening, or intricate problems with the chair’s core framework. Attempting to force a fix on a significantly damaged mechanism could worsen the problem or even compromise the chair’s structural integrity and safety.
For power recliners, any issues involving the electrical motor, wiring, or control panel should generally be handled by a qualified technician. Tampering with electrical components without proper knowledge can be dangerous and may void your warranty. Similarly, if you notice significant damage to the recliner’s frame, such as cracked wood or bent metal supports, or if the chair feels unstable and wobbly even after tightening all fasteners, a professional can assess the structural integrity and recommend appropriate repairs. A technician has specialized tools and expertise to diagnose and repair these more intricate problems, ensuring the chair is restored to a safe and functional condition.
“A persistent squeak after home remedies often points to internal wear or misalignment that’s not visible or easily fixed by lubrication alone. Knowing when to call a professional isn’t a failure, but a smart choice to protect your investment.” – John Smith, Recliner Repair Specialist
Conclusion
A noisy recliner can quickly detract from your comfort, but armed with the right knowledge and a few basic tools, you can often restore its silent serenity with a simple DIY approach. By systematically diagnosing the source of the squeak, meticulously cleaning away debris, tightening any loose fasteners, and applying the correct lubricant to key moving parts, you can effectively eliminate most creaks and groans. that preventative maintenance, including regular inspections and annual lubrication, is your best defense against future noise. Taking a little time to care for your recliner not only saves you money but also extends its life, allowing you to fully enjoy its ultimate comfort once again. What are you waiting for? Reclaim your quiet relaxation today!
Frequently Asked Questions
How often should I lubricate my recliner?
Ideally, you should lubricate your recliner’s moving parts annually, even if it’s not making noise. If your chair sees heavy daily use or starts showing signs of stiffness or minor squeaks, a more frequent application every six months can be beneficial to prevent friction and wear.
Can I use WD-40 on my recliner?
While WD-40 can offer temporary relief by loosening parts, it is primarily a solvent and water displacer, not a true lubricant. It tends to evaporate quickly, potentially leaving parts drier than before and attracting dust. For lasting results, it’s best to use silicone spray or white lithium grease.
What if my recliner squeaks only when I lean back?
If the squeak occurs specifically when you lean back, it often indicates dry or worn pivot points or bushings in the backrest mechanism. Focus your lubrication efforts on these specific areas, typically found where the backrest attaches to the main frame, and ensure all related fasteners are tight.
How do I access the mechanism under my recliner?
To access the mechanism, first fully recline your chair and, with assistance, carefully flip it over onto its front or side. Most recliners have a fabric or plastic dust cover stapled or screwed to the underside; remove this cover to expose the internal mechanical components.
Can a squeak mean my recliner is breaking?
A squeak doesn’t automatically mean your recliner is breaking. Often, it’s a sign of dry joints, loose fasteners, or minor friction that can be easily fixed with lubrication and tightening. However, if the squeak is accompanied by instability, grinding noises, or a failure of the mechanism to operate, it could indicate a more significant issue requiring professional attention.
Frequently Asked Questions
How often should I lubricate my recliner's moving parts?
You should lubricate your recliner's moving parts annually, even if it's not making noise. For chairs with heavy daily use or early signs of stiffness, a more frequent application every six months can help prevent friction and wear.
Is WD-40 an effective lubricant for recliner mechanisms?
No, WD-40 is primarily a solvent and water displacer, not a true lubricant for lasting results. It tends to evaporate quickly and can attract dust, potentially leaving parts drier. For effective lubrication, use silicone spray or white lithium grease instead.
What causes a recliner to squeak only when leaning back?
If your recliner squeaks specifically when you lean back, it often indicates dry or worn pivot points or bushings within the backrest mechanism. Focus your lubrication efforts on these specific areas where the backrest attaches to the main frame, and ensure all related fasteners are tight.
How do I access the internal mechanism of my recliner chair?
To access the internal mechanism, fully recline your chair and, with assistance, carefully flip it over onto its front or side. Most recliners have a fabric or plastic dust cover stapled or screwed to the underside; remove this cover to expose the mechanical components.
Does a squeaking sound mean my recliner is broken?
A squeak doesn't automatically mean your recliner is broken; it often signals dry joints, loose fasteners, or minor friction that can be easily fixed. However, if the squeak is accompanied by instability, grinding noises, or a failure of the mechanism, it could indicate a more significant issue requiring professional attention.
Fix a Squeaky Recliner
Silence your noisy recliner by systematically diagnosing the squeak, cleaning the mechanism, tightening fasteners, and applying the correct lubricant to key moving parts.
Move your recliner to an open area and lay down a drop cloth. Fully recline the chair, then carefully flip it over to expose the underside mechanism. Remove the dust cover to access internal components.
Use a flashlight to inspect all moving parts for debris like dust or pet hair. Use a small brush or vacuum attachment to meticulously clean away any accumulated dirt and grime, ensuring a clean mechanism for effective lubrication.
Systematically check all visible bolts, nuts, and screws on the mechanism and frame. Use an adjustable wrench, socket set, or screwdrivers to tighten any loose fasteners clockwise until snug, but avoid overtightening.
Apply silicone spray for general use or white lithium grease for heavy-duty metal-on-metal friction points. Lubricate all pivot points, springs, hinges, linkages, and glide tracks, then work the mechanism back and forth to distribute the lubricant evenly. Wipe away any excess.
Flip the recliner upright and test the reclining function multiple times to ensure the squeak is gone. If a faint noise persists, re-isolate and reapply lubricant. Once satisfied, reattach the dust cover securely to protect the mechanism.
Get our weekly buyer guide
Practical specs, not advice. Unsubscribe anytime.
I was ready to throw out my old recliner because the squeaking was driving me nuts. This guide saved me! I followed the steps for lubricating the dry mechanisms, and it worked like a charm. My chair is silent again, and I didn’t have to spend a fortune on a new one. Highly recommend trying these DIY fixes first.
My recliner started making a terrible noise every time I leaned back. I suspected it was loose fasteners, and sure enough, after checking the bolts and tightening them up, the squeak is gone. It was super helpful to have a clear guide on where to look and what tools I’d need. So glad I found this before calling a repairman.
I tried all the suggestions for my squeaky recliner, especially focusing on the worn-out parts. While some of the noise reduced, it’s not completely silent. I think my chair might just be too old, or maybe I missed something. It’s definitely better than before, but still a bit of a creak when I fully recline.
This was a lifesaver! My recliner had developed a really annoying squeak that was disrupting my evening relaxation. I followed the step-by-step approach to diagnose the problem, and it turned out to be a combination of dry mechanisms and a slightly loose bolt. A little lubricant and a quick tighten, and it’s good as new. Thanks for the clear instructions!